
Reference
You can also post labour in batches using the Batch Timesheet program in MJC - refer to "Transactions – Batch Timesheets".
Labour and materials for a service job can be entered from timesheets, via the service call sheet (job card), or direct from supplier invoices. Micronet automatically prices service jobs for you based on your own markups and labour rates.
Use this option to post labour directly to a service job in MJC.
|
|
|
Reference You can also post labour in batches using the Batch Timesheet program in MJC - refer to "Transactions – Batch Timesheets". |
Refer to "Maintaining the Service Job Header".
Micronet displays the Job Transaction Processing screen.
![]()
|
|

|
Technical Tip By default, the Job Transaction Processing screen is set to EDIT | ITEM so you add or edit materials for a job (refer to "Adding Materials to a Service Job" ). When you select this menu option, EDIT | LABOUR is selected so you can add or edit labour. You can also add or edit text for a job (refer to "Adding Text to a Service Job"). |
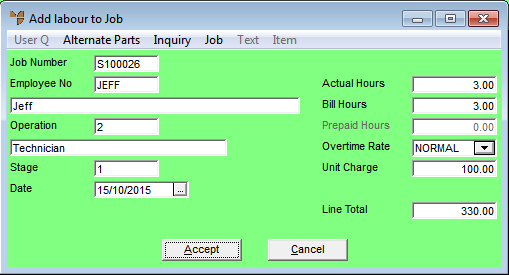
If you selected to add, insert or edit a labour line, Micronet displays the Add Labour to Job screen.
|
|
Field |
Value |
|---|---|---|
|
|
Job Number |
Micronet displays the job number. |
|
|
Employee No |
Enter the employee ID for this entry. You can also press Tab or Enter to select an employee. Micronet displays the employee name/description on the following line. This line can be overwritten if you want to store free text information relating to this transaction posting. Text entered here is stored and can be displayed on job inquiries, the job card and/or reports. |
|
|
Operation |
Micronet displays the employee's default operation. You can change this if required by overwriting the displayed operation, or by deleting the displayed operation and pressing Tab or Enter to select a different operation. |
|
|
Stage |
Micronet displays the default stage for this job as set in the Department master file (refer to "Adding a New Department"). Normally this would be set to 1. You can delete this and enter another stage if required. You can also press Tab or Enter to select a stage. |
|
|
|
Reference If your job has multiple stages and you haven't created them yet, refer to "Job Transaction Processing - Stages - Variations and Stages". |
|
|
Date |
Enter or select the date on which the employee performed the work. |
|
|
Actual Hours |
Enter the actual hours the employee worked. |
|
|
Bill Hours |
Enter the quantity of hours you want to charge your customer for. This figure can be higher or lower than the Actual Hours entered above and is multiplied by the Unit Charge shown below to determine the invoice amount (unless a net amount is to be entered on your invoice). |
|
|
|
Technical Tip If you want to credit labour for an employee, the usual method is to delete the labour line; Micronet automatically updates the employee hours for you. However, you can enter a negative quantity to credit labour. Note that this is not the recommended way of crediting labour. If you are tracking employee hours in Micronet, you may need to enter the negative quantity in Actual Hours or Bill Hours or both. The Employee Hour Analysis tracks an employee’s hours per month, how many hours they have worked and how many hours were billed. You can then report on, for example, the employees who did not bill say 70% of their time. Where a customer wants a credit for say 1 hour’s work and:
|
|
|
Prepaid Hours |
This only applies if using the Micronet Plant + Maintenance system. If you have contracts with pre-paid time, you can enter the number of hours that should be deducted from your customer's contract. |
|
|
Overtime Rate |
Select a rate to charge the customer – for example:
Rates are setup in your MJC company configuration. |
|
|
Unit Charge |
Micronet displays the charge per hour for the operation/overtime rate combination selected above. |
|
|
Line Total |
Micronet calculates and displays Bill Hours x Unit Charge. |
If you added labour to the job, Micronet redisplays the Add Labour to Job screen so you can post further labour if required.
Micronet redisplays the Job Transaction Processing screen, showing the items, text and labour posted to the job at the bottom of the screen.